This is a post about getting ultimate performance and longevity from your hard drives. Even those who run cleanups, checkdisk, and defrags may be overlooking some critical procedures to gain further performance. Read on and find out what you may have been missing! Note: if you don't understand any technical terms in this article, I will briefly define them, but you should also look them up as they are essential to maintaining a computer.
Unless you're fortunate enough to have a computer running entirely on Solid State Disks (SSDs), you're probably still using spinning Hard Disk Drives (HDDs). Many new computers still use HDDs because they're cheaper per byte and still engineered in their performance. With these tips, your HDDs can even be ideal for games and video editing.
Every tool I mention in the article will be
free and
just as good (if not better) than the pricey alternatives. I've tested several dozen programs and these provide observable performance that speaks for itself. Why should everyone maintain their hard disk drives? Because in time
a HDD and SDD inevitably suffer performance loss if not maintained (particularly HDDs).
 INITIAL CHECK FOR HARDWARE PROBLEMS
First, you need to verify that your disks are still functioning correctly. If your HDD has been used over five years, then you need to be extra cautious of hardware issues and data loss. I recommend replacing drives that old, however if you want to be more daring, these tips will help it last longer. To check the performance of your drive, you'll want to download the latest version of
Speccy.
Speccy is a wonderful free program that reveals the finest specifications of your entire computer. Once installed and open, go to the hard drive section and make sure all your HDDs have temperatures under 55C and "Good" status under the S.M.A.R.T. section. This stands for "Self-Monitoring, Analysis and Reporting Technology" (or built-in hardware monitoring for both HDDs and SSDs).
You won't need to know anymore beyond their status for this guide; however you can bookmark the wiki article on
SMART for later reading. Now you DO NOT need to worry about an SSD drive temperature showing up as
128C as it's NOT running that hot. SSDs often don't have thermometers in them and many programs default to reading none or 128C as their temp. However, it's not a bad idea to browse the other sections of Speccy to verify all other temps aren't showing in the red.
If all your drives pass this initial test, then you're ready to continue. If the SMART status is bad on one or more drives, then it's time to get a replacement drive (and your system is probably suffering great performance loss from this already). If you hear obvious signs of malfunctioning in the drives such grinding, clicking, buzzing, humming, etc. - it's most likely malfunctioning even if the SMART status is good. Don't trust either alone, always verify both
the SMART status and
the sound of your drives. I've diagnosed and repaired over a thousand HDDs and the worst ones either don't detect, freeze your entire system, or take WAY too long for your system to detect and interact with. Don't tolerate waiting more than 5 minutes for an HDD or SSD to detect, something is wrong by then.
Now if any HDD temps are over 55C, then they risk data loss and hardware damage in time. Hot HDDs can cause numerous system problems including freezes, crashes, corruption, blue screens of death (BSODs), and surprise restarts. You may need to install additional cooling around your drives or use a more efficient case for greater air-flow. I particularly recommend any case with decent fan input on the front and fan output on the back. I currently use an
Antec 900 fully loaded with fans that keep all my drives under about 35C at all times.
If you want to test your drive even further for bad hardware sectors, use
HD-Tune which has both a Pro and Free version. The Free version works just fine and you can
download it here. I typically only use HD-Tune to measure drive performance because I usually discover if a drive is bad well before this test.
CLEANING
Now that you've verified your hardware is still functioning properly, you're ready to increase its free space. For starters, you never want any storage to be 95%-100% full. SSDs are typically safe to fill up to the 90% area, but HDDs benefit tremendously from free space. HDD performance expert J.C.Kessels says a 50% full HDD is guaranteed to run almost twice as fast as a 90-100% full HDD. Even if benchmarks don't prove this exactly, sheer use and observation of a drive's performance will feel 50% smoother and responsive. He recommends keeping back-up and rarely used data on a large external drive that is much safer to fill up to about 90% because it's not constantly connected to your system. Even if your entire OS is installed on a speedy SSD, overloaded internal HDDs will still drag it down. A failing drive will cause some of the most serious performance issues where
the entire system will halt and wait for this one drive to get its act together.
To begin the clean-up process, download
CCleaner and
CCleaner Enhancer. Install CCleaner first, then run CCleaner Enhancer to expand its cleaning power tremendously. Once you open CCleaner, you can generally check everything
EXCEPT "
Saved Passwords" for all browsers, "
Windows Update Logs," and "
Old Prefetch Data". Go ahead and look over everything else, unchecking anything you also don't feel comfortable with - such as anything associated with financial software, etc. However, I've used these on numerous systems without problems.
Some users may also want to
uncheck "Cookies" for browsers if they don't want to sign-in to all their websites again. Passwords will still be saved if you unchecked those for each browser, but you may need to type the first letter of your login IDs in browsers for the saved ID/Password info to pop-up. If you know your passwords or have them stored elsewhere, then that's even better! You should have them stored outside your browser somewhere
encrypted. I recommend clearing cookies on all browsers to not only make websites load faster, but also reduce conflicts and security issues associated with less secure outdated cookies. The same applies to stale cookies in the cookie jar - yuck.
After this, download another tool called
System Ninja to cleanup a bunch of leftovers these two still miss. What I love most about System Ninja is how it also cleans corrupt Recycle Bin data that can take
up gigabytes of data in what you "thought" was gone! Yes, even in Windows 7, the Recycle Bin still faces this classic issue of corrupt leftover data in your drive's
$Recycle.Bin folder (a hidden system folder on all drives accessed by the Window's Recycle Bin). The longer you've used your drive, the more likely it is going to have corrupt Recycle bin data leeching away its free space.
Even if you reveal this folder, you often need to use advanced data commands in a Command Prompt (CMD) to truly empty it. SystemNinja will brilliantly take care of this and many other corrupt cache issues in the click of a button. For Windows 7 that uses an entirely new system of folder thumbnails in one central location, System Ninja also cleans up all those obsolete .db thumbnail files left over from Windows XP. If you've never used all three of these programs, you'll probably be amazed at how much free space you recover. A typical user of the non-Enhanced CCleaner will also see a difference!
The next step is to manually scan through your drive and delete what you don't need anymore. For starters, you can download the tiny program
LargeFiles to reveal the top 100 largest files on each drive. When your drive is around 50%-65% full, you're ready to optimize the data with defragmentation.
TWEAKS
+Properties_2012-09-20_18-29-01.png)
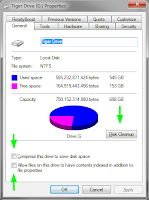
Now that your HDD health is verified with an optimal amount of free space, you're ready for some tweaks and data optimization. First, you want to make sure File Indexing and Data Compression are disabled on your constantly connected HDDs. If you do a lot of file searches through Windows, then it's worth keeping Indexing enabled for faster searches, otherwise this is costing you additional needle movement that could be used for other things.
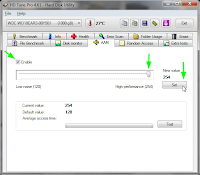
You can also unlock additional speed by disabling noise limiters on your drives. Though HDDs used to be much louder, newer HDDs won't make much of any additional noise with these functions disabled anyways and gain a significant boost in speed. Use the free version of
HD-Tune mentioned earlier to adjust this setting on your HDDs. For each HDD, go to the
AAM (Audio Acoustic Management) tab, check Enable, and set the slider to
High Performance (254). You can even run a quick Average Access Time test to see if you're really gaining a performance boost. My 1TB drive features 20 ms in
Low Noise (128) and 14 ms in High Performance (254) with no noticeable increase in noise! For this test, lower ms is faster.
ERROR CHECK - CHKDSK
In time, your HDDs and SSDs face a risk for slight or severe data and free space corruption. Often, this can be resolved through a program already built-in to Windows called
Check Disk (or
Chkdsk). This is especially crucial for laptops that are physically moved around a lot as well as drives that have been used for over a year without being formatted. This will benefit both HDD and SSD drives, so run it on everything Windows can access. Routine disk checks with chkdsk prevents data loss, crashes, and serious bottlenecks in performance.
+Properties_2012-09-23_20-27-58.png)
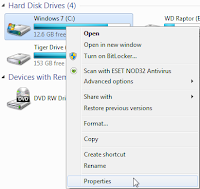
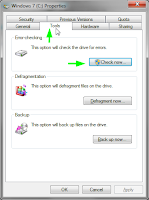
To run Chkdsk, open your Computer (or My Computer) explorer on your desktop. I highly recommend starting with the drive your Operating System is installed to which will always require a restart to perform. Right click a drive and select "Properties" and then go the "Tools" tab. Under Error-Checking, click "Check Now."
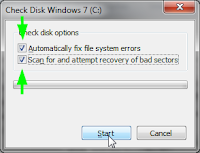
Check both check boxes in the new window and click start. Recovering bad sectors is worth the additional time it takes as this can definitely resolve performance issues. Only fixing the file system errors is a weaker maintenance procedure for people in a hurry to repair the data and don't have time to do a more thorough test. Now this will take some time depending on the type of drive (SSDs will finish much faster), size of the drive, and amount of data on it.
_2012-09-23_20-28-34.png)
Running Chkdsk on your OS drive will require you to restart so the program can run at the next boot-up before the OS is loaded and being accessed. Other drives may not require a restart or they also might as well, go along with it.
FYI: if your drives continue getting an enormous amount of corrections in each time you run Chkdsk, their hardware may be bad, or you may have a virus, or you may have serious software conflict/problem that's literally corrupting your system. In some cases, a corrupt Windows OS (particularly one that's been used for years with several hundred programs installed and uninstalled) can also persist with corrupting data further and may require re-installation if you don't have back-ups of the fresh install. Often, I've seen system performance increase tremendously after Chkdsk fixed just a couple of things so it's essential to run at least once a month on all drives. Even run it on your backup drive not always connected to the system. Boot times also seem to benefit a lot from these checks too.
DEFRAGMENTATION & FILE OPTIMIZATION
With all the other steps completed, your now ready for some serious jet fuel - defrag and raw data sorting. For this, you'll want to download these two fantastic programs:
Defraggler and
MyDefrag. Now
I've wrote about MyDefrag before and it still remains one of the top tools in my computer maintenance arsenal to this day. I remind you, only run these programs on your HDDs and not your SSDs. While defragging data certainly benefits HDDs, SSDs do not require defragmentation as data is located on memory chips in those drives which are accessed at equal read/write speeds regardless of fragmentation, location, etc. Defragging SSDs actually reduces their limited read/write cycles, though they have a huge amount that takes a very long time to reach.
Why do you need these two defrag programs? Well, Defraggler is better at defragging system files (good to run once a month or two) while MyDefrag is much better at organizing raw data. Combined, they form an ultimate tune-up even paid-for programs can't provide. Sure MyDefrag can also defrag files, but it still can't access many crucial system files or perform boot-time defrags. However, it has an extremely powerful raw location optimizer to give your system some incredible lightning-bolt response time that a defrag alone can't provide.
 |
| Notice the SSD, don't defrag it |
First we are going to run Defraggler on all your HDDs to remove initial fragmentation. Then we'll run MyDefrag's Monthly System & Data Disk raw file location optimizers on your system and data disks respectively. Install and open Defraggler, and run the "Defrag" mode (not the Quick Defrag) on all your HDDs.
 |
| I ignore System Disk since mine is an SSD |
Once that is finished, install and open up MyDefrag. Unless your OS is installed on an SSD, begin by highlighting System Disk Monthly and only checking your operating system's disk (or partition for those with multiple partitions [virtually separate disks] on the same disk). This will take some time, but it's worth it, so let it finish overnight if you need to.
Once that is finished, close and reopen MyDefrag and select "Data Disk Monthly," then check all your data HDDs, skipping any data SSDs. This process will most likely take much longer, so you'll definitely want to run it overnight, but it's seriously worth it with the amount of response time and reduced needle movement your system gains from it. Once these are done, I personally recommend running a Daily Data and System Disk defrags every couple of days or at least the Weekly Data and System Disk defrag once a week. Occasionally you can run Defraggler on your HDDs as well to defrag a few extra system files, but not too much as it'll mess with the nice turbo sorting algorithms implemented by all the modes of MyDefrag.
This may sound a bit complicated for some readers, but these two advanced file optimization algorithms are sorting all your raw data locations by alphabetical order based on the folder and file names. All the files in a folder will not only have the same location in the MFT (the organization you see) but now also the same raw location on the disk (usually they are all spread out, even when defragmented). The system disk optimizer is only intended for the disk your operating system is on and the program's author J.C. Kessels confirms that System Disk modes don't further optimize your data-only disks, even if they contain programs as well.
ADDITIONAL TWEAKS / INFO
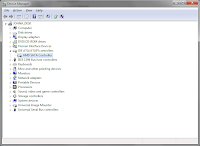
You can check to make sure there are no problematic or outdated motherboard controllers for your HDDs. Right click "My Computer" and select "Properties." Then go to "Device Manager" and expand anything around the likes of "IDE ATA/ATAPI controllers." Make sure there are no red disabled or yellow problematic icons on the device here. If so, then you need to re-enable them or re-install the proper driver from your motherboard/computer manufacturer's website. Go to their Support section and look for Drivers. Speccy will reveal the exact model of your motherboard to search for. You'll either download the latest chipset drivers or the exact "disk controller" driver. If you use a fairly new AMD/ATI based motherboard, these
AMD chipset drivers may benefit you best.
You can also expand the Hard Drives area in Device Manager to make sure none are showing red or yellow icons. In rare cases, an HDD can have a firmware update available on its manufacturer's website, however SSDs (particularly the OCZ brand) tend to have many firmware updates. However, note that when updating an SSD's firmware, you may need to format the drive clean first, so be sure to backup the data or create an "image" backup of an operating system.
Read more HDD performance tips from J.C. Kessels
here.
For those who have made it this far, I hope you've learned to gain much performance and lifespan from your Hard Disk and Solid State Drives! Thanks for reading!
 When it comes to sleep, the common wisdom for industrialized societies is 8 hours of uninterrupted rest
(or monophasic sleep). However, scholars and numerous studies say monophasic sleep is a recent phenomenon of great exposure to artificial light
after sunset. Before this, people engaged in polyphasic sleep of more than one session per day. They more particularly slept in a polyphasic pattern of biphasic sleep (2 sessions a day).
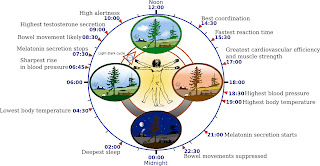
 For those already on this cycle, your body maintains a more primitive circadian rhythm. To achieve more biphasic sleep, people need exposure to at least 10 hours of natural darkness. More natural light such as moonlight and fire (candles), in theory, should allow for a greater exposure to this natural nighttime darkness. Just be sure to put a plate under candles in case you fall asleep before blowing them out. Install thick curtains on your windows and wear an eye mask if you have to - for these all help encourage more natural darkness.
 2B. DYMAXION - Dymaxion sleep asks for four 30min naps (every 6 hours) for a total of 2 hours of sleep. Those who try this (along with Uberman below) often report a bizarre jet-lag feeling of living in a never-ending day. This lasts until their internal clock fully adjusts and re-calibrates their awareness of time.
 2C. UBERMAN - Historical records indicate Leonardo DaVinci himself used this form of sleep. Uberman sleep requires six 20-30min naps (every 4 hours) for a total of 2-3 hours of sleep per day. The nap time varies person to person based on personal and environmental circumstances. Blogger Steve Pavlina tried Uberman sleep for 5-1/2 months and you can read about his experiences here.


+Properties_2012-09-20_18-29-01.png)


+Properties_2012-09-23_20-27-58.png)
_2012-09-23_20-28-34.png)


